SabeeApp calendar works with the so-called " Drag and Drop" method, so whenever you would like to upload a new reservation to your calendar you just need to select the arrival date, the room, click in the small quadrant and drag the cursor until the departure date.
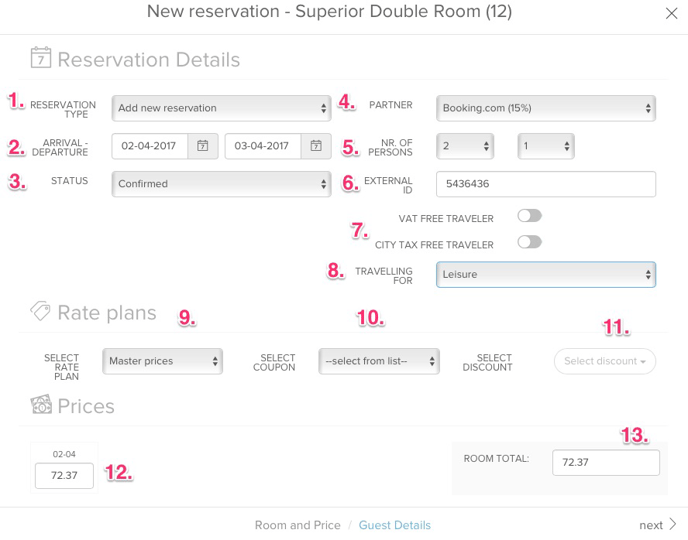
A pop-up window will immediately appear where you can define the details of the reservation on the first page, and define all the guest details on the second page:
Reservation details:

- You have 3 possibilities here: you can add a new reservation, you can block the selected dates in case of e.g. maintenance).
- Select the date of arrival and departure.
- The status menu will offer you 2 options: confirmed or optional reservation. About the optional reservations, you can read more here: Reservation with option status. The confirmed reservation in the calendar will be displayed as a blue reservation, the optional will be displayed as a red booking.
- The partner is the channel from where the reservation is coming. It can also be your own website or any offline tourist agencies. In this list, only those partners appear which you uploaded in Settings / Partners menu previously.
- In the first square you can select the number of adults, in the second one the number of children and if you have a third one as well, where you can select the number of infants. (All these settings are defined in Settings / Property policies / Children policy section) .
- External ID equals the Channel ID: this is the number which is used as a reservation ID in the extranet of the OTAs.
- If the guest does not need to pay city tax or VAT you can just slide these buttons to green position so the VAT / City tax added in your Settings / Tax settings menu won't be applied for this reservation.
- You are able to mark whether the guest is travelling for leisure or business purposes.
- In the Rate plans section you can decide which rate plan, so what price should be applied for this particular reservation. In the drop-down menu you will find those rate plans, which are created in Prices.
- If you have any coupons created in Prices menu you can directly apply them when adding a new reservation.
- If you have any discounts created in Prices menu you are able to add them in this pop-up.
- You are able to change the nightly price or you can change the total amount due as well. ( 13.)
Guest details:

Additional guests: If you know that there are more guests staying for example in a triple room you can fill in all of their names by clicking on the Additional guest option.
6. In case this reservation needs to be added to an already existing group reservation, you should just type in the name of the group to which you would like to add this reservation.
7., If a guest is sent from a Company (for example it is a business trip) you are able to fill in the Company details as well, so, later on, you could issue the invoice for the company directly, not for the guest.
8. You can leave any internal comments for the reservation here
9. If the guest provided the Credit card details, this is the right place to upload them. These will be stored on the detailed reservation page, in a coded form.
10. Here you can go back to the Room and Price section
11. This button will create the reservation and show you the calendar page
12. This button will create the reservation and show you the reservation page