How to connect to Airbnb
When you would like to connect your Sabee account with Airbnb, you need to complete several steps. Here we list the necesarry settings you need to do in the Airbnb extranet and also all the steps to connect your Airbnb listings to SabeeApp. You can follow this step by step guide to set up everything correctly.
We also suggest to read through the following Airbnb guide that describes in details the possible changes in the commission amounts once the channel manager connection is activated.
Minimum requirements of the connection
First of all, you should know some important information before connecting:
- Make sure that all settings in Airbnb regarding prices are set accordingly. Make sure your extra person prices are set correctly. Also check that all listings have correct descriptions and pictures. After connection with SabeeApp, you will not be able to make any changes in Airbnb profile regarding pricing and availabilities and booking settings. You will be able to modify ONLY the listing details (amenities, photos, location, description)
- If you have Smart Pricing feature enabled in Airbnb, you have to turn it off before the connection. Otherwise sync will not work.
- It is necessary to have instant booking enabled for the listings in Airbnb. If you don't have Instant Booking feature active, then after connection it will become enabled by default.
- If you want to connect co-hosted listings, you have to copy the Host ID of the original Airbnb account where these co-hosted apartments are listed.
- If you have any promotions applied in Airbnb, after the connection they will not be available anymore.
- Long stay discounts will be added and managed from SabeeApp account
- In order to have one and a half year sync enabled to your Airbnb account, you should make sure that Listing's booking window is set to all future dates. (Listings Availability menu/Reservation preferences/Booking window / All future dates).
- Make sure that in Airbnb for each listing, under Rooms & guests section you have marked the section " Which is most like your place" ?

In case you select "House" type in Airbnb here, make sure you have selected any of the following Property types in your SabeeApp account : House or Villa / Bungalow / Chalet or Cottage in Settings / Room type settings.
- Make sure that the listings are published in AirBnB's extranet. If the listings are unpublished you will receive the following error during the mapping process:
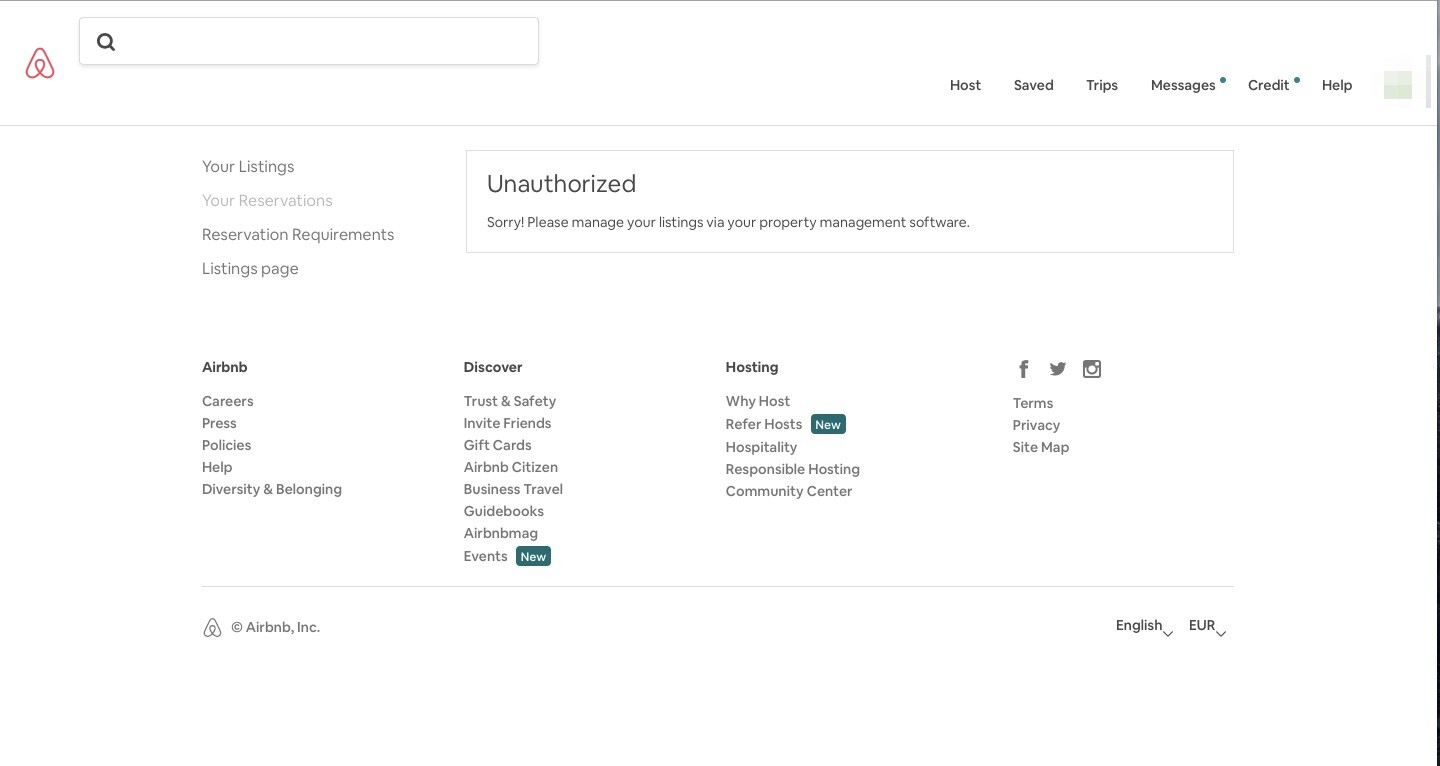
Before you start the connection process it is recommended to temporarily close sales both on the OTA site and in your SabeeApp account during the channel connection process. This helps ensure a smooth integration and prevents potential issues.
To close sales in your SabeeApp account:
-
Navigate to Distribution→Channel Manager → Dashboard Distribution.
-
Locate the Open/Close Sales button.
-
Deactivate the button to temporarily close sales.
Once the connection is established and all future reservations have been imported and assigned to the correct rooms, remember to reactivate the button to resume sales.
Connection steps
-
To initiate the Airbnb connection, you’ll need your Host ID.
-
Log in to your Airbnb account.
-
Go to the Home > Profile menu, as shown in the screenshot below.
-
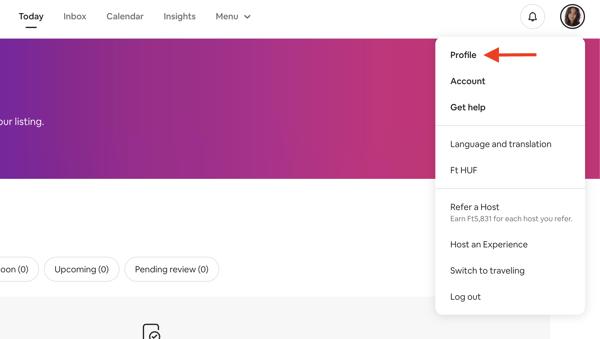
Once you're logged in as a Host:
-
Click on the URL in your browser (
https://www.airbnb.com/users/profile) -
Then replace it with this URL:
https://www.airbnb.com/users/show

After pressing Enter, the page will reload and the URL will change to something like:https://www.airbnb.com/users/show/{USER_ID}
Your Host ID is the number shown in place of {USER_ID}.

2. Once you arrive to your Sabee account, go to Distribution menu / List of all channels and find Airbnb. Click on the Connect to channel link.

3. Then you will need to select the Partner like in any other connection case.
You also need to enter your Host ID at the properties which you want to connect to Airbnb. IMPORTANT: if you have all your apartments listed under one Airbnb account, then fill in the same ID next to each apartment that you want to connect. In case you are running several Airbnb profiles, then make sure that correct Host ID is filled based on where the apartment is listed.
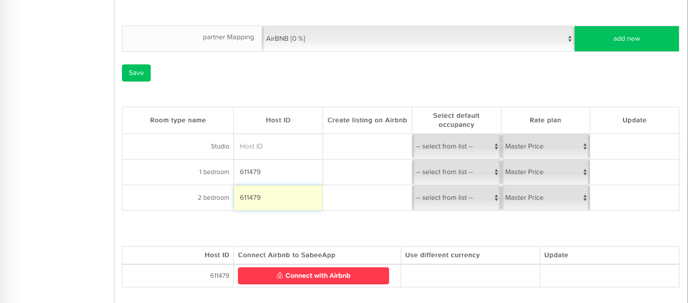
4. After entering your Host ID, click the red Connect with Airbnb button. This will redirect you to your Airbnb profile. Please note that you must have the following information filled out correctly in your Airbnb Account:
- Profile picture
- Verified email address
- Verified phone number
- Government ID
Without these, it will not let you proceed to the next step.
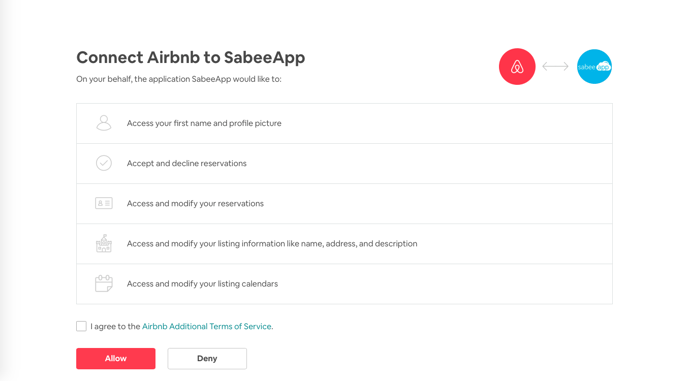
Mark the box below the table and click Allow button.
Once you see this window, you can go back to your SabeeApp profile by clicking button Return to SabeeApp.
⚠️ Important Note: Connecting Airbnb with SabeeApp
Each Airbnb account can be connected to only one SabeeApp account.
This means that if you want to manage two separate room types under the same Airbnb listing and connect them to two different SabeeApp accounts, this will not be possible within a single Airbnb account.
To achieve this, you’ll need to create and use a separate Airbnb account for one of the room types.
Please note that this rule applies to all online travel agency (OTA) connections in SabeeApp:
- One SabeeApp account can connect to multiple OTA accounts,
- but each OTA account can connect to only one SabeeApp account.
5. With this setup the connection between your SabeeApp account and Airbnb is done. Next, you have to connect your SabeeApp room types with the Airbnb listings. Click on "Select from list" in the "Airbnb listings" column then select the room. Only those accommodations will be visible here which are marked as Listed on Airbnb.
6. Time to set default occupancy which is being set for this apartment in Airbnb. By this step, it's really important that you have to map the occupancy what has been set as the "extra guest" in AirBnB's extranet. For example, the extra guest is "after 2nd occupancy" in AirBnB's extranet so you have to map the 2nd as default occupancy in SabeeApp.
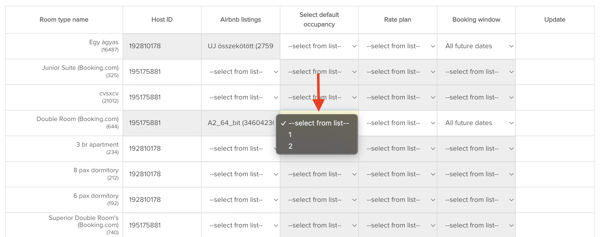
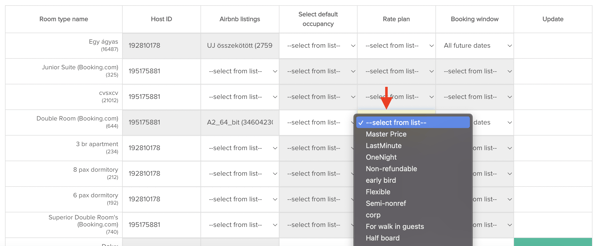
7. "Booking window" column: With the help of booking window you can choose, in which time frame you'd like to use your configuration settings. This could be 3, 6, 9 month or "All future dates". We suggest to use "All future dates" because with this setting you can receive bookings well in advance.
8. Once all is selected, push the Update button

Now you can repeat the same steps for rest of the properties.
9. When you are ready with the connection for Airbnb, as a last step you will need to import your existing future reservations for each of your connected Listings. 
By clicking on Import, the system will replace the old external channel ID, with the ones in your Airbnb account. This is important because when there is a modification or cancellation for the reservation in Airbnb, the changes will be displayed in your SabeeApp account as well.
The system will look at the name of the reservation and the Airbnb generated email address and replace the old channel IDs. In case the system is not able to replace the reservation channel ID, it will import the booking as a duplicate.
Please look through the Dashboard and List view to see if there is any duplicated reservation from Airbnb and delete the unneccesary ones with the old channel ID.
Top tips to help improve your ranking in search results
What can be done if you connected the wrong room type?
You will need to disconnect your Airbnb listing, make the changes and then reconnect all the listings again. Please see this article for disconnection.
