SabeeApp’s Front Office Manager is a mobile app designed to streamline guest data administration. With this app, you can scan guest documents, such as:
✅ ID cards
✅ Passports
✅ Driving licenses
✅ And more
The scanned information is securely forwarded to your PMS with just a few taps. This is especially useful for:
-
Collecting sensitive guest data
-
Legal compliance (e.g., Hungarian VIZA system)
How to Get Started
1. Enable the Smart Solutions Module
Before using the app, you must activate Smart Solutions in:
📍 Settings → Subscription Menu
2. Download the App
Once activated, download the app using the links below:
📱 iOS (iPhone) – Requires iOS 13 or later: Click here to download
📱 Android – Requires Android 9 or later: Click here to download
How the App Works
-
Uses OCR (Optical Character Recognition) to extract text from documents.
-
No photos are taken of the IDs.
-
Scanning happens on-device – no third-party data processing.
📌 Note: The app is currently available only in English.
Logging into the App
After downloading and installing, log in using your SabeeApp PMS credentials.
🔑 Who Can Use the App?
✔️ Owners & Operators
❌ Housekeepers & Visitors cannot access the app.
💡 If you manage multiple SabeeApp accounts with Smart Solutions enabled, you can select the property upon login.
Navigating the App
Upon login, you are redirected to the reservation list, showing all today’s arrivals. From here, you can:
✅ View guest details
✅ Scan and manage guest documents
✅ Sync data with PMS
Overview of the Application
After logging in, you will be redirected to the reservation list, where you can see all guests arriving today.
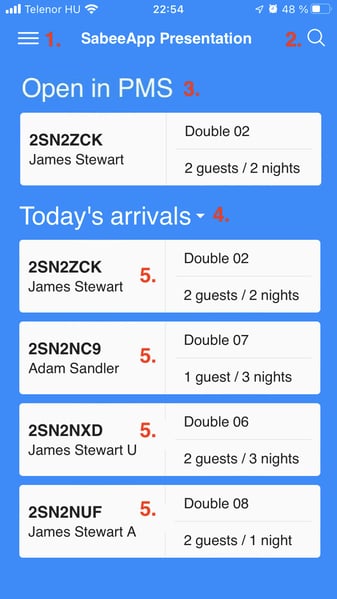
The app provides several key functions:
1. Profile Menu
📍 Tap this button to:
-
View your profile
-
Log out of the application
-
Switch properties (if you manage multiple SabeeApp accounts)
2. Search
🔍 Search for reservations by:
-
Booker name
-
Reservation code
(Only today’s and yesterday’s reservations are included in the search.)
3. Open in PMS
🔗 If you are logged into both PMS and Front Office Manager with the same user, this section will display the reservation page currently open in PMS.
-
Tap the reservation to view details and start ID scanning.
-
This feature works regardless of the check-in date, allowing you to scan guest documents for future reservations.
4. Today’s Arrivals
📆 View a list of today’s and yesterday’s arrivals.
-
Tap this section to filter reservations by date.
5. Open a Reservation
📁 Tap on any reservation to open its details and start ID scanning for the guests.
How to Scan Documents with the App
1️⃣ Open a Reservation
After tapping a reservation, you will see its basic details to verify you have selected the correct guest.
2️⃣ Select a Guest
Tap on the guest's profile card within the reservation.

3️⃣ Start ID Scanning
Tap the ID scan button to launch the scanning tool.

📌 First-Time Use: The app will request camera access—please grant permission to proceed.
4️⃣ Scan the Document
-
Point your camera at the document and follow on-screen instructions.
-
Depending on the document type, you may need to scan both sides.

✅ Tips for Best Scanning Quality:
-
Place the document on a clean, flat surface
-
Ensure good lighting conditions
-
Adjust backlight & zoom if needed
5️⃣ Review the Scanned Data
To start a new scan, return to the Guest Card and initiate a scan from there.

✏️ Edit Scanned Data
You can now edit scanned guest information directly from the app.
Where to edit:
- Scan Results Page – Tap "Edit" after scanning.


Editing Interface:
The edit screen is similar to the GuestAdvisor online check-in form.

🚫 Disable RFID-Based ID Scanning
Some users prefer not to use RFID-based scanning. You can now disable it in the Settings menu.
How to disable RFID scanning:
- Open the side menu and go to Settings.
- Toggle the RFID scan on/off.

🏠 Manually Add or Edit Address Details
You can now manually enter or modify a guest’s address:
- After scanning – Edit scanned data before saving.
- Later – Modify the address from the Edit Guest Details screen.

Saving and Syncing Guest Data
Once you save your changes, the scanned guest data is automatically sent to your SabeeApp PMS. You will see a confirmation icon on the guest card indicating a successful sync:

After that, you can proceed with scanning documents for the remaining guests.
If you check the reservation in the PMS, the guest details will now be visible. Simply navigate to the detailed reservation page and check the Guest details section:

📌 Important Notes
✅ Recommended Devices:
-
Use a smartphone released after 2019 for better camera quality and improved scanning accuracy.
🚫 Not Recommended:
-
Tablet devices or iPads – Their cameras are not optimized for document scanning, which may result in lower-quality scans.