Once you've configured your Room Types, the next step is to create the individual Rooms for each type. The exact availability synchronized with booking channels is determined by the number of rooms created in this menu.
Understanding Room Setup Based on Business Type
🏡 Apartment Rentals
In most cases, one Room Type represents one apartment, as each apartment is unique and rented separately. Your calendar setup should look like this:

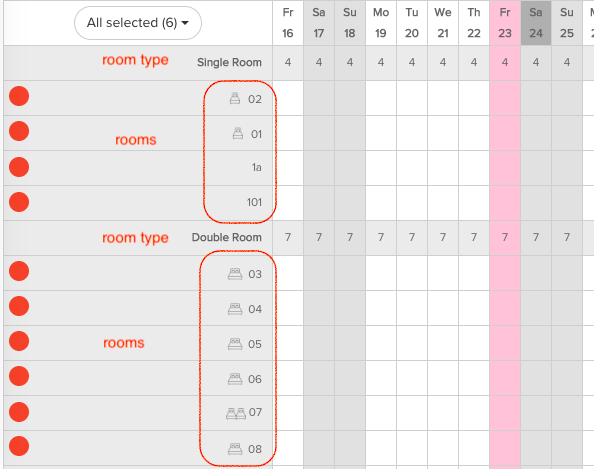
🏨 Hotels & Other Multi-Unit Properties
If you operate a hotel or a property where multiple rooms belong to the same Room Type, your calendar setup should look like this:
How to Add a New Room
To add a new room, follow these steps:
1️⃣ Navigate to:
- Settings (top menu) → My Rooms (left menu)
- Click on"Add New"
Configuring Room Details
🏷️ Name
- Typically, this is the room number (e.g., "Room 101").
- For apartment rentals, enter the apartment name (e.g., "Riverside Apartment").
- The room name is visible only in your SabeeApp calendar but can also be displayed on invoices if needed. (Learn more HERE).
🛏️ Room Model & Type
- Room Model: Select which Room Type this room belongs to.
- Property Type & Room Type: These fields are automatically assigned based on the selected Room Model.
🛌 Bedding Preference
- Indicate the bed configuration for this room.
- This helps in identifying rooms in the calendar more easily.
✅ Room Status
- Active: The room is available for booking.
- Inactive: The room is temporarily removed from inventory but can be reactivated later.
📝 Comment
- Add internal notes about this room. (Visible only to you.)
🏢 Floor
- Specify which floor the room is on. (Visible only to you, it can be useful when planning Housekeeping.)
📌 Special Room Settings
📉 Exclude from Published Inventories
- If enabled (green), the room will not be available for booking on your Internet Booking Engine (IBE) or other sales channels.
- Useful for:
- Internal use rooms (e.g., staff accommodation, buffer rooms).
- Rooms under specific allotments.
- Parking lots or non-rental spaces.
💾 Final Step: Save Your Changes
Once you've completed the setup, don't forget to click "Save" to apply the changes!
🔁 Duplicate Room:
Once you create your first room in a category (room type), you can use the duplicate button to quickly create more rooms of the same type. The new room will be labeled as "Room 1 Duplicate." Simply click on the room name and edit it to reflect the actual room name or number (e.g., "Room 2").
 📦 Reorganise Rooms:
You can also reorganise the order of your rooms by using the drag-and-drop method.
🛠️ Add Divider:
You can add a divider to visually separate different properties or addresses in the calendar view and using the drag and drop method place it exactly where you want it to be:

Following these steps ensures that your room availability is correctly synchronised with all booking channels, helping you manage your property efficiently. 🚀